
Browse the documentation
Team Members & Roles
Applies to: All users · Optional feature — available when your network has it switched on
If your company runs its account with more than one person, you can invite colleagues to work alongside you — each with their own login and their own scoped permissions — without ever sharing your password. This guide explains how.
What this is#
Team members let several people operate one account. There's one owner (the person who signed up); the owner invites others, who keep their own personal login and simply gain the ability to switch into the owner's account and act there. Nobody shares a password, permissions are scoped per person, and every action is recorded against both the person and the account.
Availability: Team members are enabled per account. If you don't see a Members option in your account menu or sidebar, the feature isn't turned on for your account — an administrator can enable it for the account owner.
When you'll use this#
Use it when your company grows past one person on the account: a campaign manager, a reporting analyst, a billing contact, or a trusted deputy. Instead of everyone logging in with the same shared email and password (risky, and impossible to audit), each person gets their own login and exactly the access they need.
How shared accounts work#
- One owner per account — the original account holder, with full control including billing and ownership.
- Members keep their own identity. After accepting an invite, a member switches into your account from their account switcher or hub.
- Permissions are scoped. The owner decides exactly what each member can see and do.
- A member can never do more than the owner can — their permissions are always a subset of the owner's own.
- You're "in" one account at a time. To move to a different account you return to your own first, then switch elsewhere. This keeps the audit trail clean.
Step by step#
Invite a member#
- Open the Members page (owner and admins only).
- Click Invite.
- Enter the person's email address.
- Pick a role — Admin or Member.
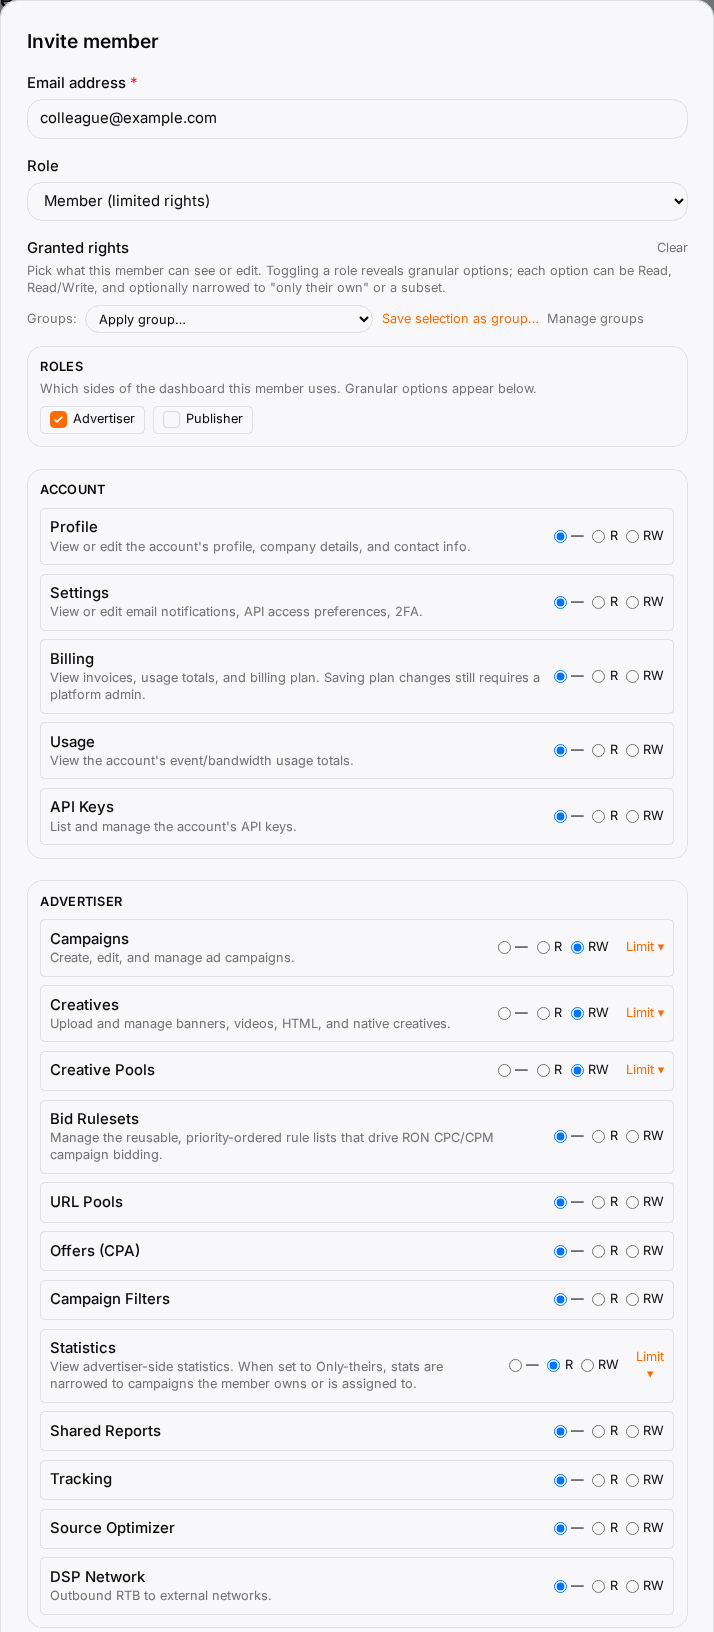
- For a Member, choose their rights — tick the areas and access level they should have (see the rights reference below). Or apply a saved bundle in one click.
- Click Send invite. They receive an email with a link.
If the invited email already has an account, they simply accept and gain the new account in their switcher. If it's a new email, they're guided to set a password first, then land in your account. Invite links are valid for a limited time; you can resend if one expires.
Choose what a member can access#
- In the invite (or edit) form, work through the rights areas.
- Rights map to the sections of the app, so you can, for example, let someone manage campaigns and read stats but never touch billing.
- For each area, grant read-only or full access as offered.
- You can only grant what you have yourself — advertiser areas appear only if your account is an advertiser, publisher areas only if it's a publisher.
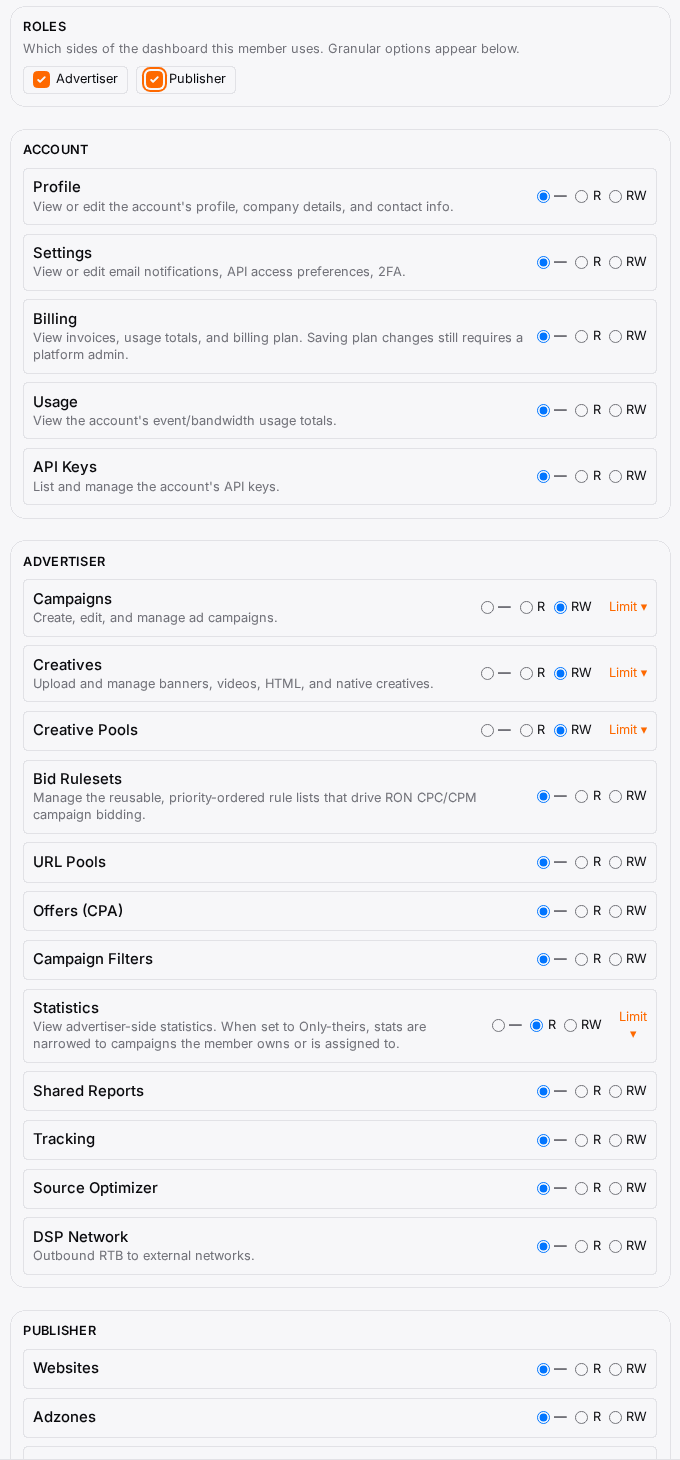
Save and reuse a rights bundle#
- When you've set a useful combination of rights, save it as a named bundle (for example "Campaign Manager" or "Reporting only").
- Next time you invite or edit someone for the same role, apply the bundle in one click instead of re-ticking everything.
Manage or remove a member#
- On the Members page, find the person.
- Choose Edit to change their role or rights (takes effect on their next action), Resend to re-send an expired invite, or Revoke to remove access immediately.
Switch between accounts#
- If you belong to more than one account, open the account switcher in your account menu — or the hub you land on after logging in.
- Pick the account you want to work in.
- A coloured "Acting as …" banner reminds you when you're inside someone else's account, with a one-click button back to your own.
- To enter a different account, use that button to return to your own first, then switch.
Options reference#
Roles#
| Role | What it can do | Notes |
|---|---|---|
| Owner | Full control, including billing and ownership. | Exactly one per account; can't be transferred casually. |
| Admin | Everything the owner can do except ownership-level actions (removing the owner, deleting the account, changing core billing). | Good for a trusted deputy. |
| Member | Only what their assigned rights allow. | Ideal for focused roles like "campaign manager" or "view-only reporting". |
Rights areas you can grant#
| Area | Covers | Appears when |
|---|---|---|
| Account | Profile, settings, billing (read), usage, API keys, members. | Always |
| Advertiser | Campaigns, creatives, offers, filters, tracking, statistics. | Your account is an advertiser |
| Publisher | Websites, ad zones, offers, filters, statistics, finance. | Your account is a publisher |
Each area is granted at a read-only or full level, and you can only grant rights you hold yourself.
Member management actions#
| Action | What it does | Notes |
|---|---|---|
| Invite | Send an invitation email with a role and rights. | Owner and admins only. |
| Edit role / rights | Change what a member can do. | Takes effect on their next request. |
| Apply / save bundle | Reuse a saved set of rights. | Speeds up inviting several people to the same role. |
| Resend invite | Send the invitation email again. | Use if it expired or was missed. |
| Revoke | Remove a member's access immediately. | Their personal account is unaffected; their past work stays on your account. |
Switching actions#
| Action | What it does |
|---|---|
| Account switcher | Choose which account to work in (from the account menu). |
| Hub | The account picker you land on after logging in if you have more than one account. |
| Back to your account | Leaves the account you're acting in and returns to your own. |
Example#
Adding a campaign manager who shouldn't see billing:
- Open Members → Invite.
- Enter the manager's email and choose the Member role.
- In the rights picker, grant full access to Campaigns, Creatives, and read access to Statistics — leave Billing untouched.
- Save this as a "Campaign Manager" bundle for next time.
- Click Send invite. When they accept, they can build and manage campaigns but never see your invoices.
Tips#
- Grant the minimum needed. Give members only the areas they actually work in.
- Use Admin sparingly. Reserve it for people you'd trust with almost everything.
- Review members periodically. Revoke access for anyone who has left or changed roles.
- Secure your own login. The owner login is the most valuable one — turn on two-factor authentication.
- Revoking is safe. Removing a member never deletes their contributions to your account, and never touches their personal account.
Troubleshooting#
| Symptom | Likely cause | Fix |
|---|---|---|
| No Members option anywhere | The feature isn't enabled for your account | Ask an administrator to enable it for the owner |
| An invite email never arrived | Wrong address, or it went to spam | Check the address, ask them to check spam, then Resend |
| The invite link says it expired | Links are valid for a limited time | Use Resend to issue a fresh link |
| A member can't see a section you granted | They're viewing before the change took effect, or your account lacks that role | It applies on their next action; confirm your account has the underlying role |
| A member can't switch to another account | You must return to your own account first | Use the Back to your account button, then switch |
| I can't grant an advertiser/publisher right | Your account doesn't have that role | You can only delegate rights you hold yourself |
Related#
- Account & Profile — your own profile and settings
- Password & Two-Factor Security — protect the owner login
- API Keys — how programmatic access works with team accounts
- Welcome & Getting Started — roles and navigation basics
- Notifications & Alerts — who receives the account's notifications
- How to invite a team member and set their rights — step-by-step guide