
Browse the documentation
Account & Profile
Applies to: All users
Your account page is where you keep your contact and billing details up to date, set your preferences, and manage your roles. It's the home base for everything personal about your account.
What this is#
The account page gathers your personal and company information, your invoice address, your preferences (language, email options, roles), your security options, and — on manager accounts — your usage and billing. It's organised into tabs down the side, and which tabs you see depends on your account type.
When you'll use this#
Visit it when you first set up (fill in your profile and address so invoices are correct), whenever your details change (moved office, new VAT number, new phone), when you want to turn a role on or off, adjust which emails you receive, change your password, or check what your account has been doing this billing period.
Step by step#
Open your account page#
- Click your name or avatar in the top corner to open the account menu.
- Choose My Account (or the equivalent account link in the sidebar).
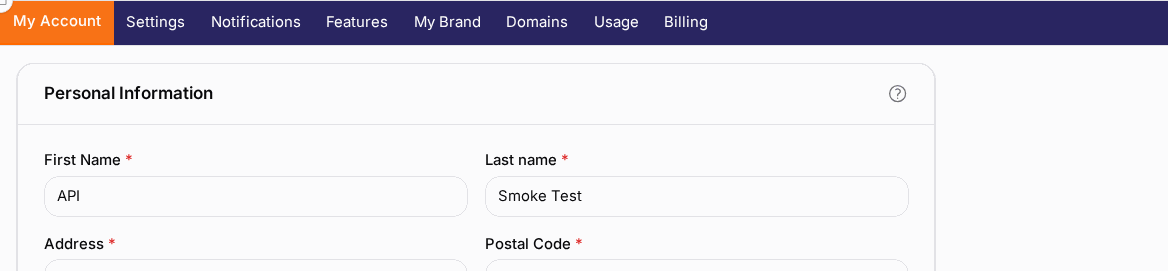
- The page opens on the My Account tab, with the other tabs listed down the side.
Update your profile and address#
- On the My Account tab, fill in or correct your name, address, company, phone, and other fields.
- If you're a company, tick Is Company and enter your VAT number where prompted.
- Click Save.
- On most accounts the change takes effect immediately. On some networks, changing a sensitive field (email, name, or address) triggers an email verification step — see "Changing sensitive details" below.
Set your invoice address#
- Still on My Account, find the invoice section.
- Leave Use account address ticked to bill to your main address.
- Or untick it and enter a separate invoice address, postal code, city, and country.
- Click Save. This is the address that appears on your invoices.
Change your password#
- On the My Account tab, open the password section.
- Enter your current password, then your new password twice.
- Watch the strength meter and aim for something strong.
- Click Save. Use the new password next time you log in. (Full details in Password & Two-Factor Security.)
Adjust preferences and roles#
- Open the Settings tab.
- Turn roles (Advertiser / Publisher) on or off, choose which emails you receive, set your language, and manage security options.
- Click Save.
Choose what notifies you#
- Open the Notifications tab.
- Tick, per event, whether you want it by email, in the in-app bell, or sent to a Telegram or Slack destination you've added.
- Full detail — digest mode, adding destinations, which events can't be switched off — is in Notifications & Alerts.
Options reference#
Tabs#
| Tab | What it covers | Shown when |
|---|---|---|
| My Account | Personal and company details, invoice address, password. | Always |
| Settings | Preferences, roles, email options, security, and your API key. | Always |
| Notifications | Which events notify you, and through which channel. See Notifications & Alerts. | Always |
| Features | Optional features you can switch on for your own account. | Manager (AdManager) accounts |
| Ref Payments | Commission from users you referred. | Manager accounts with the referral-commission flag |
| Referrals | Clients our team assigned to you as a sales partner, and the commission on their deposits. | When sales referrals are enabled and you are set up as a sales partner |
| My Brand | Your own branding, once the Brand feature is active. | When the Brand feature is enabled for you |
| Domains | The ad, panel and tracking domains you manage. | Manager and tracker accounts, and anywhere domain management is enabled |
| Usage | A breakdown of your account activity for the billing period. | Manager and tracker accounts |
| Billing | Your plan, invoices, and payment history. | Manager and tracker accounts |
My Account — profile fields#
| Field | What it's for | Notes |
|---|---|---|
| First name / Last name | Your name on the account. | Appears on invoices. |
| Address, Postal code, City, Country | Your postal address. | Used for invoicing and contact. |
| Company | Your company name. | Leave blank if you're an individual. |
| Is Company | Marks the account as a business. | Reveals VAT and company-related fields. |
| VAT number | Your VAT registration. | Shown when a company is set. |
| Job title / Contact person | Optional role and contact details. | |
| Your login and primary contact address. | Changed through verification — see below. | |
| Phone | Your phone number, with a country dialling-code selector. | |
| Website | Your main website. | Advertiser/publisher context. |
| Finance emails | Extra addresses that should receive billing emails. | Manager accounts. |
| IM handler | An instant-messaging contact, if your network uses one. |
Once your company details have been verified, some address and company fields lock to prevent accidental changes. Contact support if verified details genuinely need updating.
My Account — invoice address#
| Field | What it does |
|---|---|
| Use account address | When ticked, invoices use your main account address. |
| Invoice Address / Postal code / City / Country | A separate billing address, used when "Use account address" is unticked. |
Settings — roles#
| Option | What it does | Notes |
|---|---|---|
| Is Advertiser | Enables the advertiser tools (campaigns, ads, targeting). | Once active it usually can't be turned back off without an administrator. |
| Is Publisher | Enables the publisher tools (websites, ad zones, earnings). | Same one-way behaviour on most networks. |
Settings — email preferences#
| Option | What it does |
|---|---|
| Promotional newsletters | Receive marketing and product-news emails. |
| System messages | Receive important account and operational notices. |
| Rejected ads email | Get notified when one of your ads is rejected (advertiser). |
These three are the coarse, long-standing email switches. For per-event control — and for channels other than email — use the Notifications tab instead; see Notifications & Alerts.
Settings — security and access#
| Option | What it does | Notes |
|---|---|---|
| IP verification | Adds an extra check that logins come from an authorized IP. | |
| API access | Enables programmatic access via your API key. | Some accounts have this set by an administrator. See API Keys. |
| Two-Factor Authentication | Set up an authenticator app for login. | See Password & Two-Factor Security. |
| API key | View, generate, or rotate your key. | See API Keys. |
Settings — display and domains#
| Option | What it does | Notes |
|---|---|---|
| Language | Choose your interface language. | Shown when your network offers more than one. |
| Tags as list | Changes how tag/CSV fields are entered. | Cosmetic preference. |
| Ad domains / Static domain | Pick the serving domains for your account. | Shown when domain management is enabled. |
Your theme (light or dark) is set from the app's appearance toggle and remembered per device — it isn't a field on this page.
Changing sensitive details#
Your email is your login, so it's protected. Rather than editing it inline, an email change goes through a verification flow: you confirm ownership of the new address before it becomes active. Until you confirm, your old email keeps working.
On some networks, changing other sensitive fields (name or address) also triggers verification: you'll get a code by email and a banner will prompt you to confirm the change before it applies. From that banner you can resend the code or cancel a pending change.
Confirming the change. The email contains a confirmation link. Click it: it opens your account (sign in first if needed) and applies the change straight away — Changes verified and applied successfully. If the link doesn't work for you, open your account, click Verify Changes and type the Verification code from the same email. Until then the change shows under Pending Changes Awaiting Verification with the Changed fields, and Discard this change cancels it.

Features you can switch on#
On ad manager networks, the Features tab lists optional parts of the platform you can switch on for your own account. Each card says what the feature does; click Enable and confirm.
| Feature | What it adds |
|---|---|
| AdManager | The full advertiser and publisher workflow: run campaigns, monetise your own inventory, CPM and CPA bid types. Permanent — once enabled it can't be switched off again. |
| Tracker | Click tracking, offers, tracking links, reports and postbacks. |
| RTB / SSP | Programmatic supply-side connections: external demand, networks, exchanges and header bidding. |
| Smart Zones | Ad zones that combine several ad networks and pick the best-paying one per placement. |
| Ad Scanner | Automatic scanning of creatives and landing pages for compliance and malware. |
| My Brand | Run the dashboard on your own domain with your own theme (see below). |
Only features your network offers are listed. Switching a feature off removes its menus but keeps your data: switch it on again and your campaigns, offers or smart zones are where you left them. A feature that still holds live data — for example tracker offers or smart zones — can't be switched off until you delete or move that data; the message tells you what is left.
My Brand#
Once My Brand is enabled under Features, the My Brand tab lets you run the dashboard for your own clients on your own domain:
- Enter a Brand name (shown in the top bar and in emails) and a Brand domain, such as
dashboard.mycompany.com. - At your DNS provider, add the record shown under Point your domain (a CNAME on a subdomain — CNAMEs don't work on the root of a domain).
- Save. The domain is checked automatically: Awaiting DNS verification usually turns into Live — DNS verified, SSL issued within a few minutes. Check status re-checks; if SSL verification fails, the page shows what to correct.
- Use Edit theme to set your colours and logo, and tick Active (apply this theme on the domain).
- Optionally add your own reCAPTCHA v2 Key (Site Key) and Secret for the sign-in page on your domain (register the brand domain in the Google reCAPTCHA console first).
Remove brand disconnects the domain; your uploaded files are kept.
Referrals for sales partners#
If our team assigns clients to you as a sales partner, the Referrals tab shows them: the number of Clients, what you Earned this month and Earned in total. The Clients list gives each client's Assigned on date, their Deposits and Your commission; Commissions lists each deposit and the commission it earned you. You earn the percentage shown at the top on every deposit a client makes from the day they were assigned to you.
This is different from the Referral Program, where you invite people yourself with a referral link.
Switching accounts#
If you are a member of other accounts — a company account you were invited to, for example — you choose which one to work in. After login, Choose an account lists every account you can work on with your role (Owner, Admin or Member) and marks the Currently active one.
To change later, open the account menu and click Switch account. While you work in another account, the top bar shows Acting as with that account's name; Back to your account returns you to your own. To move from one company account to another, go back to your own account first.
Usage summary#
On manager accounts, the Usage tab summarises your activity for the billing period: how many campaigns and websites you have, how many are active, and your event volume grouped by day, month, or year. It's a quick health check on what your account is doing — for the money side, see Billing & Usage.
Example#
A new company advertiser setting up correctly:
- Open My Account. Enter your name, company, address, and phone.
- Tick Is Company and enter your VAT number.
- If your billing address differs, untick Use account address and enter the invoice address.
- Click Save (confirm any email verification prompt).
- Open Settings, confirm Is Advertiser is on, choose your language, and decide which emails you want.
- Turn on Two-Factor Authentication while you're here — see Password & Two-Factor Security.
Tips#
- Fill in your address before your first invoice. It's what appears on billing documents.
- Company + VAT go together. Enter your VAT number so invoices are correct for your accountant.
- Roles are usually one-way. Turning on Advertiser or Publisher is easy; turning it back off generally needs an administrator.
- Finance emails are extra recipients, not a replacement for your login email — add your accountant there so billing emails reach them too.
- Verified company details lock. That's a safety feature; contact support if a genuine change is needed.
Troubleshooting#
| Symptom | Likely cause | Fix |
|---|---|---|
| I can't edit my address or company | Details are verified and locked | Contact support to update verified details |
| My email change didn't take effect | The verification step wasn't completed | Check your inbox for the code and confirm from the banner; old email works until then |
| The VAT field isn't showing | The account isn't marked as a company | Tick Is Company first |
| I don't see Usage or Billing tabs | They only appear on manager and tracker accounts | This is expected elsewhere |
| A role toggle is greyed out | The role is already active (one-way) or restricted | Ask an administrator if it needs changing |
| Language selector is missing | Your network only offers one language | No action needed |
Related#
- Password & Two-Factor Security — change your password and enable 2FA
- API Keys — programmatic access to your account
- Team Members & Roles — add colleagues without sharing your password
- Billing & Usage — invoices, plan, and event volumes
- Welcome & Getting Started — roles and navigation basics
- Notifications & Alerts — the Notifications tab and the bell