
Browse the documentation
Creating a Campaign
Applies to: Advertisers
The create wizard walks you through a campaign one step at a time, showing only the options that apply to the campaign type and ad type you pick. You can start from scratch, from a saved template, or let the AI fill helper draft the basics for you and then edit.
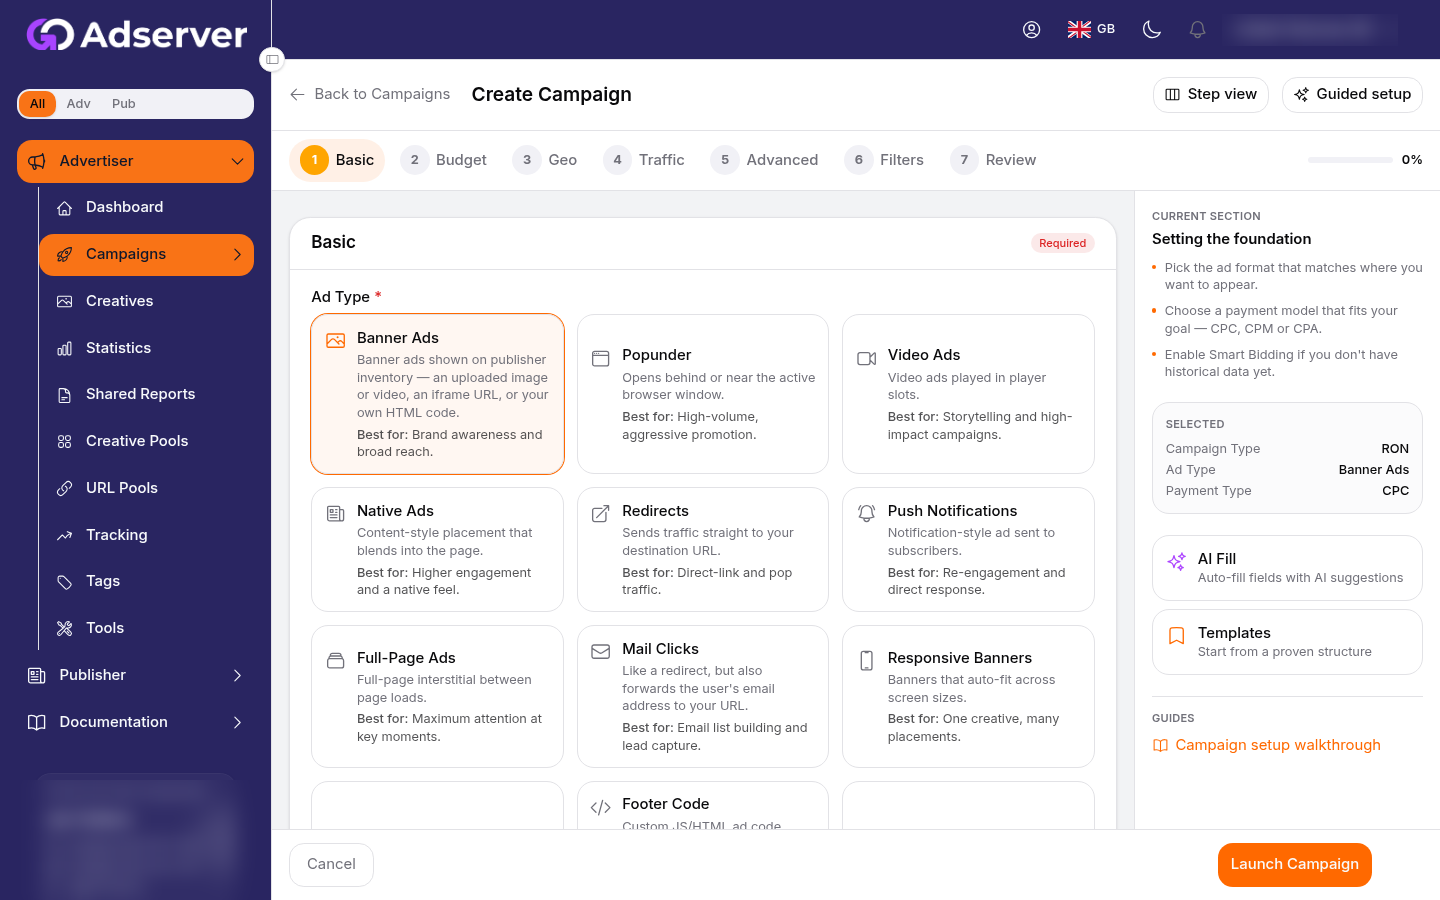
The create wizard — pick an ad type on the Basic step, then work through budget, geo, targeting and review.
What this is#
A guided, multi-step form that ends with a live campaign. The steps, in order, are:
- Basic — the ad format and how you pay.
- Budget — how much and how fast you spend.
- Geo — where your ads run.
- Traffic — device, OS, browser, connection, language and IP pool.
- Advanced — schedule, day parting, frequency capping and keywords.
- Filters — domain and ad zone filters, a SubID list and IP white/blacklists.
- Ad Zones — specific placements (where offered).
- Review — a summary and warnings before you go live.
The Ads step only appears after the first save — a new campaign has to exist before ads can be attached to it — so save first, then add the ads that will run. RTB campaigns have no Ads step at all: the ad comes from your bidder's response. See Ads & Creatives.
When you'll use this#
Every time you launch something new, or when you clone an existing campaign and adjust it. The same wizard opens when you Edit a campaign from the campaigns list.
Step by step#
Getting started#
- Open Campaigns → Create Campaign.
- Choose how to begin:
- From scratch — walk every step yourself.
- From a template — pick a saved template to pre-fill the form, then adjust.
- AI-assisted — describe your campaign in plain words and let the assistant suggest a starting configuration you can edit.
Step 1 — Basic#
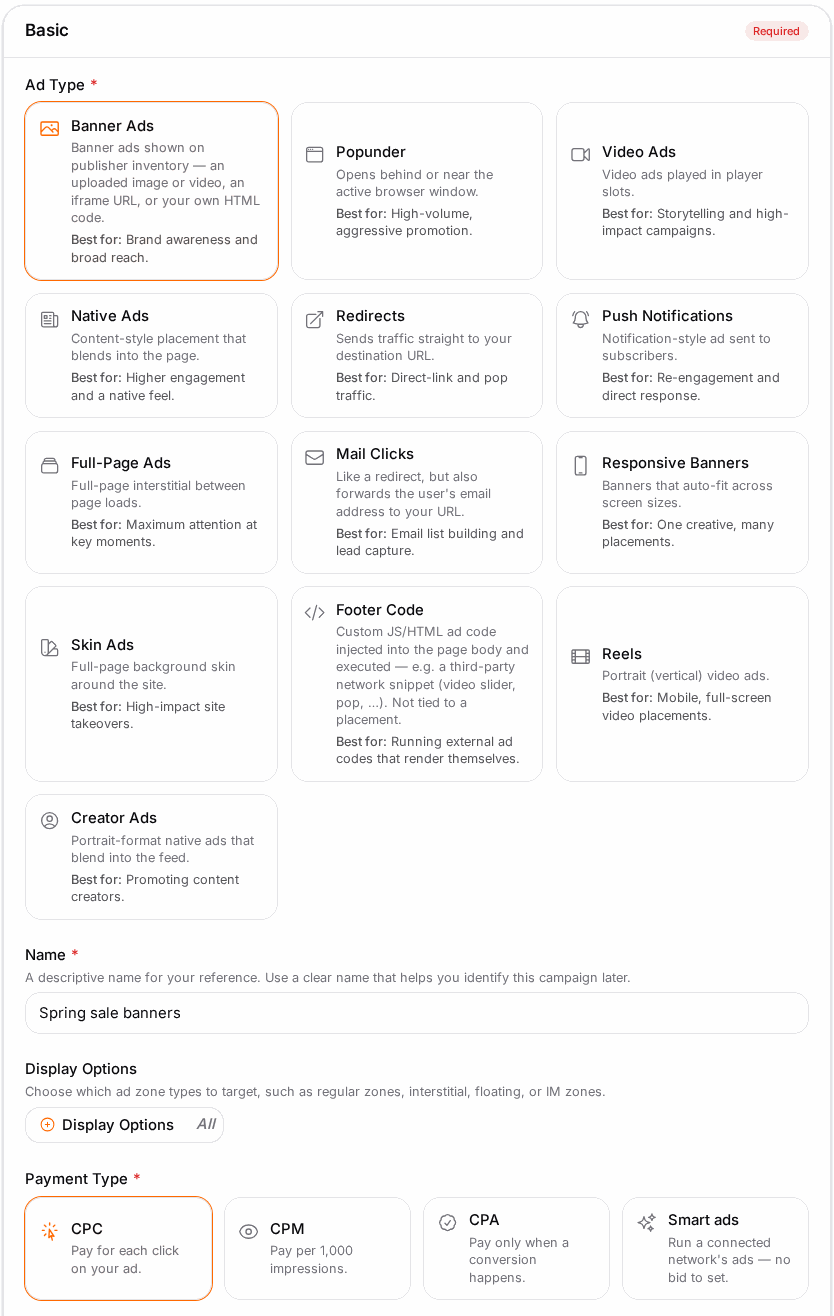
- Enter a Campaign name for your own reference.
- Choose the Campaign type (RON, CPM/Targeted, RTB — flat deals are usually network-created). See Campaign Types.
- Pick the Ad type from the format cards (banner, video, native, push, text, skin, footer/redirect, offer). This drives every later step and the creative options.
- Select the Pay type (CPM, CPC, or a CPA-family option). The available choices depend on the type and ad type.
- Fill in any type-specific fields the wizard reveals (see the RTB and offer notes below).
- Optionally set Main category, sub-categories, ad sizes, and tags/group.
- Click Next.
Step 2 — Budget#
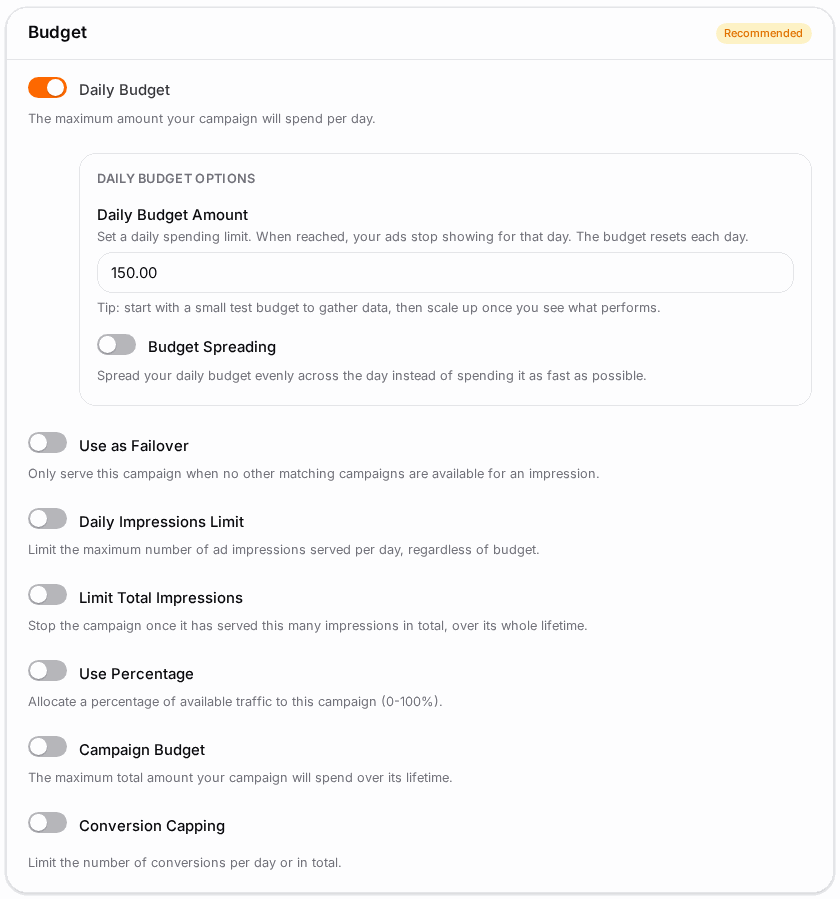
- Turn on Use Daily Budget and enter a Daily Budget amount. When reached, your ads stop for the day and resume the next day.
- Optionally enable Budget Spreading to pace spend evenly through the day instead of spending as fast as possible.
- Set your default bid — the base amount used when no per-geo or rule bid overrides it.
- Optionally set daily caps (Limit Daily Impressions/Clicks) or a percentage of traffic.
- Optionally turn on Use Campaign Budget and enter a lifetime total (must be greater than zero). The campaign stops when this is spent.
- Optionally set a CPA goal (for optimised campaigns), conversion capping, and email me when budget is reached.
- Click Next.
Step 3 — Geo#
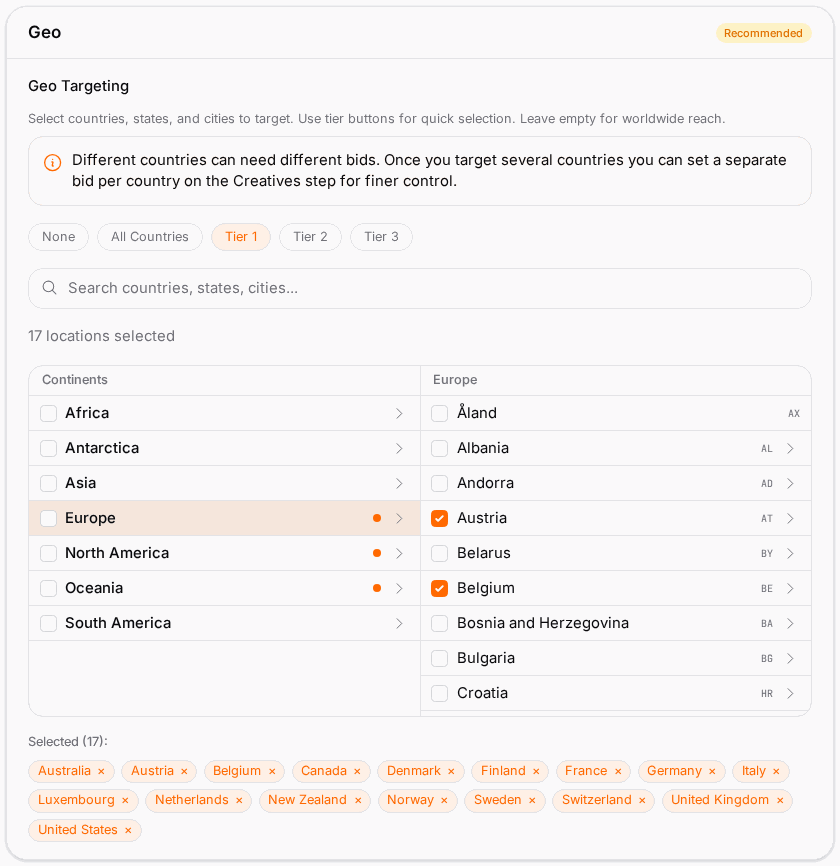
- Use a Tier button to quick-select a common country group, or expand the continent → country → region → city tree to target precisely.
- Tick the countries (or regions/cities) you want. Selecting a country includes all its regions and cities unless you drill deeper.
- Leave everything empty for worldwide reach.
- If you target several countries, you can later set a separate bid per country on the creatives.
- Click Next. See Targeting & Filters for the full include/exclude model.
Step 4 — Traffic#
- Choose Device types (desktop, mobile, tablet).
- Include or exclude Operating systems and Browsers.
- Optionally restrict by Connection type (Wi-Fi, cellular) and Carrier.
- Optionally restrict by Browser language and Site language.
- Where your network offers IP pools, pick an IP pool to serve only to those IP ranges.
- Click Next. Leave a dimension empty to mean "any".
Step 5 — Advanced#
- Set Dayparting / scheduling — the hours and days your campaign may serve.
- Optionally add keywords (where supported) or limit the campaign to tagged zones.
- Set frequency capping to limit how often the same user sees your ad.
- Click Next.
Step 6 — Filters#
- Attach a saved Domain Filter or Adzone Filter you built — saved filters can be reused across campaigns. See Targeting & Filters.
- Type a SubID Filter directly here, one SubID per line, and set SubID Filter Mode to Whitelist (serve only on these) or Blacklist (never serve on them).
- Optionally enter an IP Whitelist or IP Blacklist (one address, CIDR block or range per line).
- Click Next.
Step 7 — Ad Zones#
- Where your network offers it, pick the specific ad zones (placements) this campaign may run on.
- Leave it open to run across all eligible placements.
- Click Next.
Step 8 — Review#
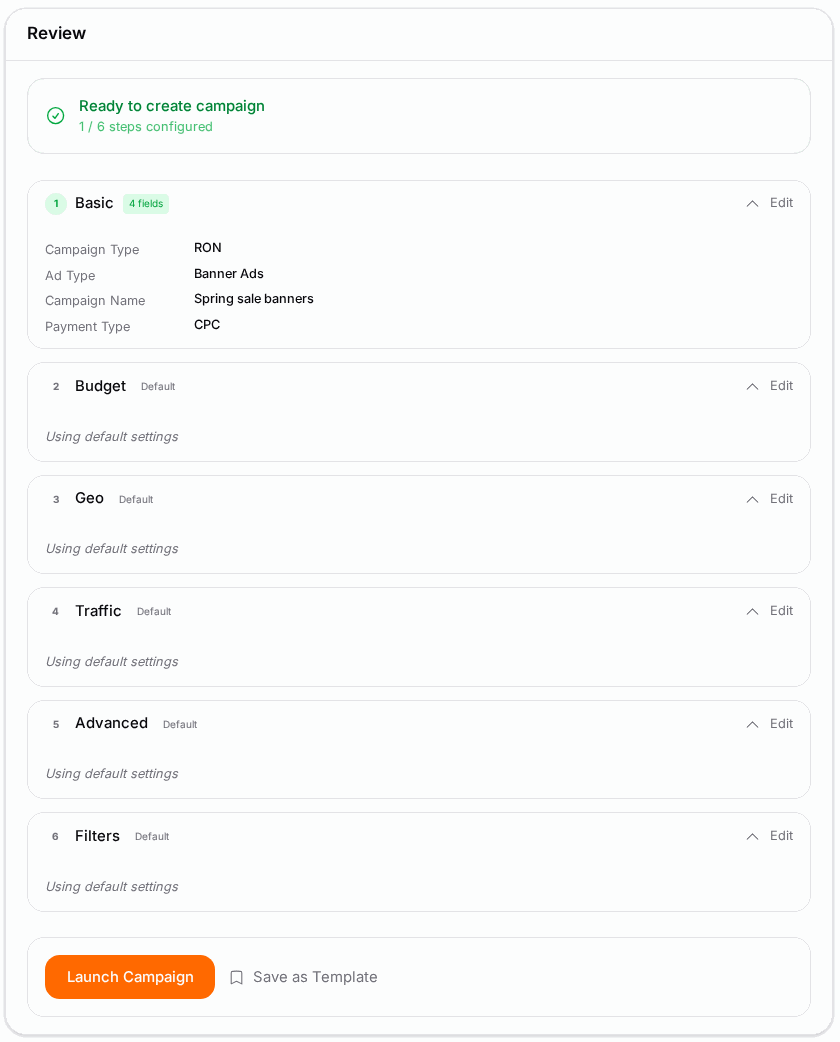
- Read the summary of every setting. The review flags anything missing or likely to limit delivery (for example, no ads, a very low bid, or extremely narrow targeting).
- Fix anything flagged by clicking back to that step.
- Click Save. On networks that require it, the campaign may enter Pending approval until reviewed.
- The Ads step now appears (except for RTB): add the ads that will run, then pause/clone/edit from the campaign list.
Options reference#
Step 1 — Basic#
| Option | What it does |
|---|---|
| Campaign name | A label for your own reference. |
| Campaign type | RON, CPM/Targeted, RTB, or a flat deal. |
| Ad type | Banner, video, native, push, text, skin, footer/redirect, offer — drives the rest of the form. |
| Pay type | The pricing model: CPM, CPC, or CPA/CPL/CPI/CPS. |
| Selling type | How inventory is sold to the campaign, where offered. |
| Main category & sub-categories | Classify the campaign so it matches appropriate inventory. |
| Ad sizes / banner sizes | Which creative dimensions this campaign uses. |
| Tags / group | Organise the campaign for the list view. |
| Ad sorting | (RON) How ads inside the campaign are ordered/chosen. |
| Instant impression | (RON video) Count the impression immediately. |
RTB campaigns additionally ask for: RTB network, RTB type (OpenRTB/JSON/XML), use type, request/endpoint URL, ad size, auction type (first- or second-price), optional QPS limit, and RTB categories.
Offer / CPA campaigns additionally ask for: the fixed CPA amount, which conversion types count, a preview URL, and referral percentages.
Step 2 — Budget#
| Option | What it does |
|---|---|
| Use Daily Budget / Daily Budget | Maximum spend per day; delivery pauses for the day once reached. The minimum depends on ad type. |
| Budget Spreading | Spread the daily budget evenly through the day instead of spending as fast as possible. |
| Default bid | The base bid used when no per-geo or rule bid overrides it. |
| Limit Daily Impressions / Clicks | Hard daily volume cap, independent of budget. |
| Use Percentage | Allocate a percentage (0–100%) of available traffic. |
| Use Campaign Budget / Max. Campaign Budget | Optional lifetime total; the campaign stops when spent. Must be > 0 when enabled. |
| Email when budget reached | Notify you when the campaign budget runs out. |
| CPA goal | For optimised campaigns, the target cost per action. |
| Conversion capping | Limit conversions counted per day or in total. |
| Use as Failover | Serve this campaign only when no other campaign matches an impression. |
Steps 3–7 — Targeting#
All of geo, device/OS/browser, language, domains, adzones, sub-IDs, categories, retargeting, IP pools, scheduling and frequency capping are covered in depth in Targeting & Filters.
Example#
A cautious mobile push launch. You want app installs from US and Canada mobile users, but you don't want to burn budget before you know what works:
- Step 1: name it "Push — US/CA — App installs", type RON, ad type Push, pay type CPI, and pick your app-install conversion type.
- Step 2: turn on Use Daily Budget at $20 (a deliberate test budget), enable Budget Spreading, and set a modest bid.
- Step 3: target United States and Canada only.
- Step 4: device Mobile only; leave OS/browser open.
- Step 5: schedule 08:00–23:00 local, and set frequency cap to 1 per user per day.
- Step 8: the review warns you have no ads yet — you add three push creatives, then save.
After a few days you check stats, cut the domains that spent with no installs via an exclude filter, raise the daily budget to $80, and let it run.
Reusing a winner as a template. Once that campaign performs, open it and Save as template. Next launch, start From a template, pick it, change only the geo, and you're live in a minute.
Tips#
- Start broad, then narrow. Over-targeting on day one starves the campaign of data. Widen first, cut later using your stats.
- Use a small test budget first; scale up once you see what performs.
- The Review step is your safety net — never skip its warnings.
- Save proven configurations as templates to launch similar campaigns in seconds.
- Leaving a targeting dimension empty means "any" — you don't have to fill in every field.
Troubleshooting#
| Symptom | Likely cause | Fix |
|---|---|---|
| "Campaign budget must be greater than zero" | You enabled Use Campaign Budget but left the amount at 0. | Enter a positive lifetime budget, or turn the campaign budget off. |
| Save is blocked with a validation message | A required field is empty or a value is out of range (e.g. daily budget below the ad-type minimum). | Follow the highlighted field back through the steps and correct it. |
| You can't switch the pay type on edit | Switching between the CPM/CPC family and the CPA family is blocked after creation. | Clone into a new campaign with the correct pay type. |
| RTB or offer fields don't appear | The campaign type/ad type doesn't include them, or the feature isn't enabled. | Set the right type in Step 1, or contact your account manager. |
| The review warns "no ads" | You haven't added creatives yet. | Add ads in the creatives step or from the campaign's ads page after saving. |
| New campaign stuck at Pending approval | Your network reviews new campaigns before they run. | Wait for review; the status updates to Active or Rejected. |
Related#
- Campaign Types & Pricing
- Ads & Creatives
- Targeting & Filters
- Bid Rules
- Campaigns Overview
- Adding Funds
- Creative & URL Pools
- Campaign Groups
- How to create your first campaign — step-by-step guide
- How to create a video campaign — step-by-step guide
- XML Feeds — native items from a product feed
- Pricing & Volumes — minimum bids and available traffic