Documentation › Getting started Your Dashboard Applies to: All users
On this page The dashboard is your home screen — a customizable board of panels showing the numbers that matter most to you. You decide which panels appear, how big they are, and in what order.
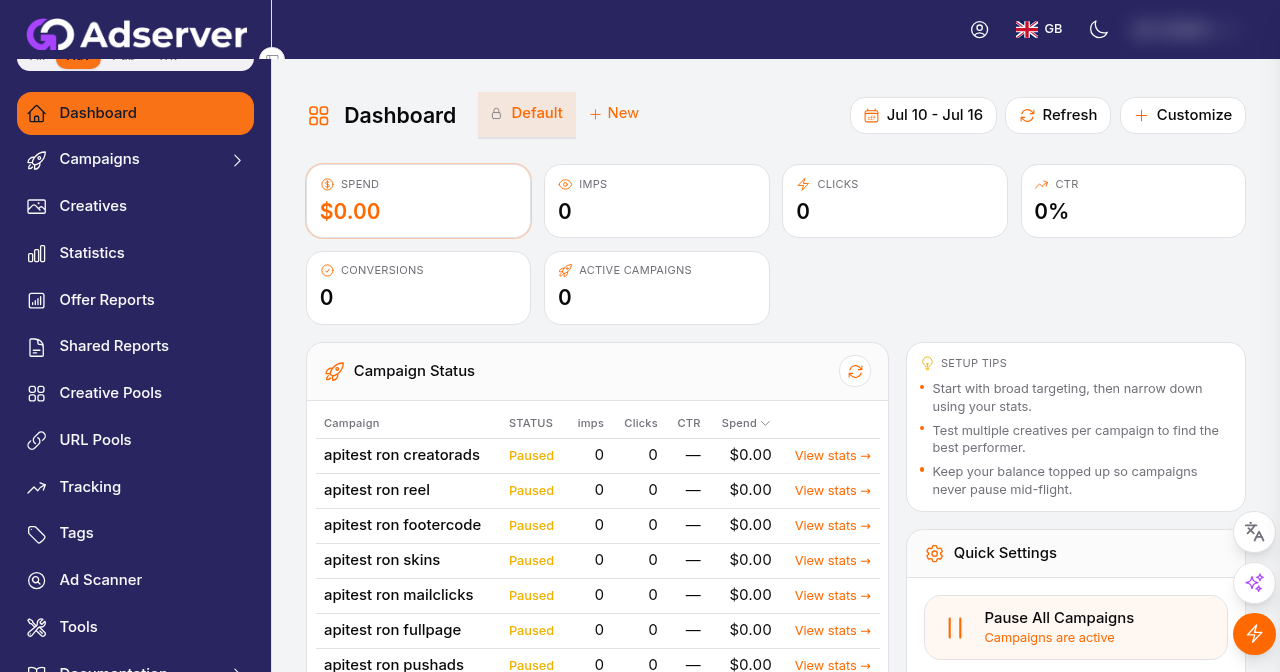
Your dashboard: summary tiles across the top, panels below, and the date-range and Customize controls at the top right.
What this is# Your dashboard is built from panels . Each panel is a self-contained card — a chart, a top-5 list, a world map, or a quick-action box. You arrange panels into a layout , and you can keep several named layouts and switch between them. Which panels are offered depends on your role: advertisers get campaign panels, publishers get earnings panels, and affiliates get offer panels.
When you'll use this# You'll land here every time you log in. Use it for an at-a-glance health check — today's spend or earnings, your best campaigns or zones, where your traffic is coming from — and as a jumping-off point to the deeper screens. When you want to make it truly yours, use the edit controls to add, remove, resize, and rearrange panels, or build separate layouts for separate jobs (a lean "finance" board, a detailed "performance" board).
Step by step# Read your dashboard#
Log in — the dashboard opens automatically.
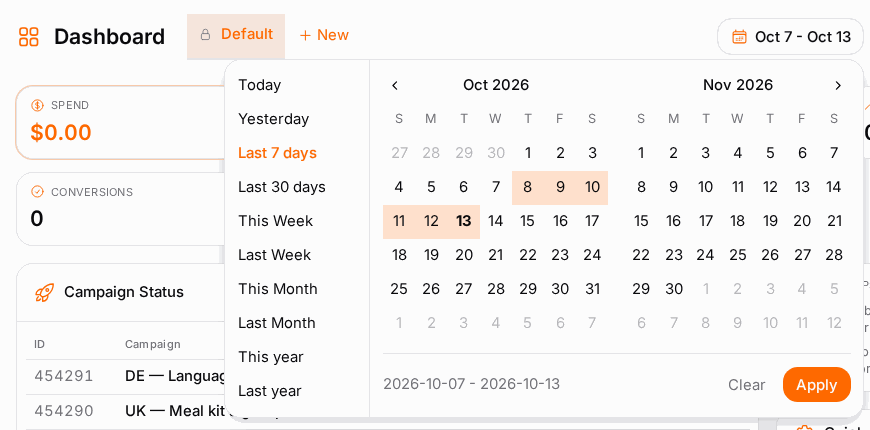
Panels load their data for the current date range shown in the date-range picker at the top.
Hover a chart to see exact figures; click a top-5 item or a panel's link to jump to the full screen behind it.
Change the date range#
Find the date-range picker at the top of the dashboard.
Pick a preset (today, this week, this month, etc.) or choose custom start and end dates.
Every data-bearing panel — charts and top-5 lists — updates together to the new period.
Add a panel#
Turn on edit mode using the edit control on the dashboard.
Click the + Add Panel tile (or open the panel catalog).
Browse the catalog — it only lists panels available to your role.
Click a panel to add it to your layout. It appears on the board.
Move, resize, and hide panels#
In edit mode, drag a panel by its header to move it. A drop indicator shows where it will land.
Resize a panel by dragging its edge — panels span a set number of columns and can be one or two rows tall.Maximize a panel to focus on just that one.Remove or hide a panel using its panel controls (or the panel catalog).Your arrangement saves automatically to the active layout — there's no separate Save button for layout changes.
Create and switch layouts#
Open the layout menu and choose New Layout (or the equivalent "+").
Give it a name (for example "Finance" or "Performance").
Choose how to start it:
Clone current — copy the layout you're on now, then tweak.Blank — start empty and add panels yourself.A template — start from a suggested arrangement.
Pick a structure — Grid or Columns (see the options reference below).
Click Create . The new layout becomes active.
To switch later, open the layout menu and select a different layout.
Options reference# Layout structure modes#
Mode
What it does
Notes
Grid Panels tile freely across the width, wrapping to new rows — the most compact view.
You control each panel's exact size and position.
Columns Panels stack into tidy columns (a main column plus a side rail), auto-zoned by type.
Great for scanning top to bottom; less manual arranging.
Layout actions#
Action
What it does
Notes
New / Create layout
Start a new named layout, optionally cloned from an existing one or a template.
Choose Grid or Columns at creation.
Rename layout
Change a layout's name.
Activate / switch layout
Make a layout the one you see.
Only one layout is active at a time.
Delete layout
Remove a layout.
You can't delete the layout that's currently active, and you can't delete your last remaining one.
Panel controls (in edit mode)#
Control
What it does
Drag handle (header)
Move the panel to a new position.
Resize edge
Make the panel wider/narrower or taller/shorter.
Maximize
Expand the panel to fill the view for a closer look.
Remove / hide
Take the panel off the board (add it back from the catalog anytime).
Settings (some panels)
Change a panel's metric or filter — e.g. rank a top-5 list by clicks instead of views.
Advertiser panels#
Panel
What it shows
Campaign Overview
A daily chart of impressions, clicks, conversions, and spend for your campaigns.
Campaign Stats
Spend and performance summarised across fixed periods (today, yesterday, this/last week, this/last month).
Top 5 Campaigns
Your best campaigns, ranked by the metric you choose.
Top 5 Countries
Where your traffic comes from.
Top 5 OS
Which operating systems your audience uses.
Quick Settings
A fast switch to pause or resume all your ads at once.
Publisher panels#
Panel
What it shows
Earnings Overview
A daily chart of your views, clicks, conversions, and earnings.
Earnings Stats
Earnings summarised across fixed periods.
Top 5 Ad Zones
Your best-earning ad zones.
Top 5 Countries
Where your audience is located.
Top 5 OS
Operating systems of your visitors.
Top 5 Browsers
Browsers your visitors use.
GEO Impressions
A world map coloured by impression volume per country.
Quick Settings
Handy shortcuts for common publisher tasks.
Affiliate / offers panels#
Panel
What it shows
Offer Stats
A daily chart of your offer performance.
New Offers
Recently added offers you can promote.
Top 5 Offers
Your best-performing offers.
Shared panels#
Panel
What it shows
News
Announcements, new features, and tips from the network, filtered to your roles.
Get Started checklist
A per-role to-do list for new accounts (complete your profile, create your first campaign, place your first ad zone). Hides itself once you've finished.
Example# Building a lean "morning check" layout:
Open the layout menu → New Layout , name it "Morning Check".
Choose Blank and the Columns structure, then Create .
Turn on edit mode and click + Add Panel .
Add Campaign Stats (or Earnings Stats ), Top 5 Campaigns (or Top 5 Ad Zones ), and News .
Drag them into the order you like; the layout saves itself.
Each morning, switch to "Morning Check" and set the date picker to Today for an instant snapshot.
Tips#
Set the date range first. Everything on the board follows it, so choose your period before reading the numbers.Keep separate layouts for separate jobs. One board for money, one for performance, one for a quick daily check.Use Columns if arranging panels feels fiddly. It auto-zones panels for you.The Quick Settings pause switch is powerful. It pauses or resumes all your ads at once — handy in an emergency, but double-check before flipping it.New account? Work through the get-started checklist — each item links straight to the screen you need.
Troubleshooting#
Symptom
Likely cause
Fix
A panel shows no data
The date range has no activity, or the account is brand new
Widen the date range; give a new account time to accumulate data
I can't drag or resize panels
Edit mode is off
Turn on edit mode first
The panel I want isn't in the catalog
It's for a role your account doesn't have (or the wrong view mode)
Switch view mode, or enable the role in Account & Profile
My layout looks different than yesterday
You're on a different layout
Open the layout menu and switch back to the one you want
I can't delete a layout
It's the active layout or your last one
Activate a different layout first; keep at least one
Advertiser and publisher panels are mixed up
You expected the other side
Use the view-mode switch — each side keeps its own layout
← Welcome & Getting Started All documentation Account & Profile →